
How to paint stairs can mean a variety of different things such as the painting the banister, spindles, risers or even the stair walls. Deciding what to paint depends on the overall look you are going for and what condition your stairs are in to start with.
Since stairs are such a focal point in a house, painting a staircase can be an easy and inexpensive way to transform them, adding both value and beauty to your home.
Here is my guide to how to paint your stairs. I will tell you how to paint the stair risers, spindles, railings and even the stair wall, as well as before and after pictures of our stairwell makeover.
Table of Contents
How to Paint Stairs Starts with Stair Terminology
In order to paint stairs, you need to decide what part of the stairs you are going to paint. Knowing the different parts of a staircase will also allow you to make your online searches for staircase DIY tutorials and inspiration more successful.
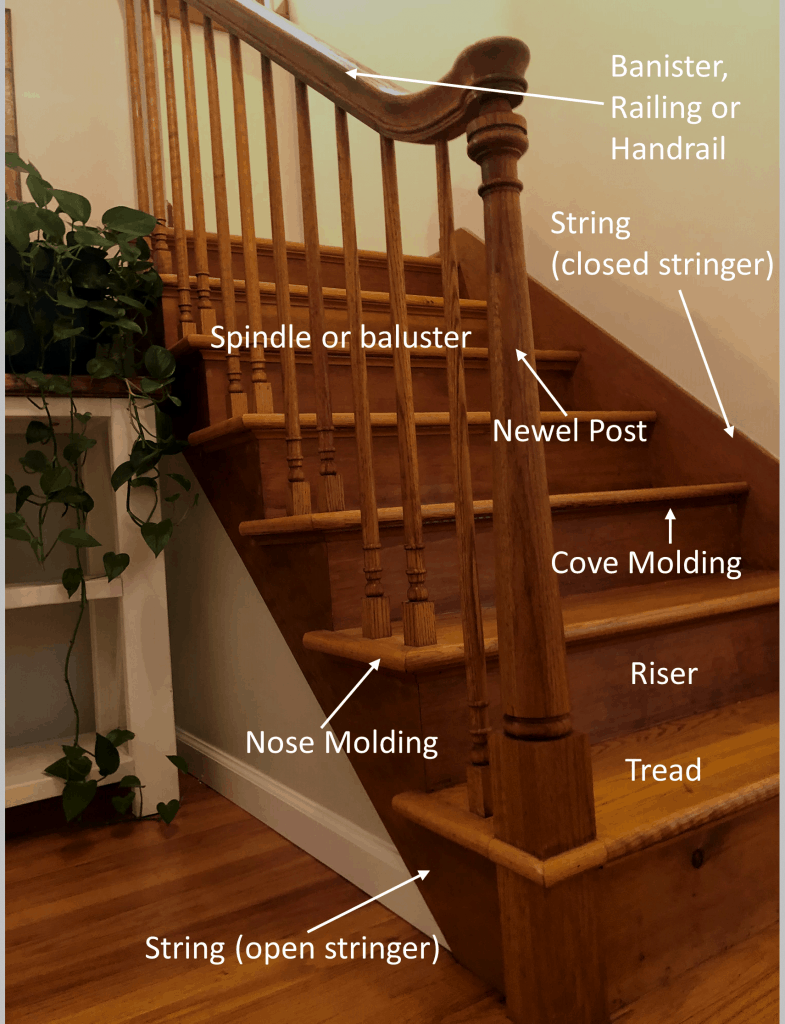
- Baluster or spindle: These words refer to the poles that connect the stair to the railing.
- Newel Post: It is at the beginning or end of the spindles. The one that begins your staircase is known as the starting Newel Post and the one at the top or end of your staircase is known as the Landing Post.
- Banister or railing or handrail: While these terms are all interchangeable, it is more common to use banister for the railing above the spindles and handrail for railing on the opposite wall of the spindles.
- String (closed vs open stringer): The trim that goes on walls of the stairs. When the string sits on top of the stairs, it is called a closed stringer. When it sits underneath stairs, it is called an open stringer.
- Risers (Rise): This is the vertical part of each stair.
- Tread (Run): This is the horizontal part of each stair, where you step.
- Nose Molding: The rounded end of each tread is known as the nose molding or nosing. As part of the tread, you want it to remain the same color as the tread. You can see it also goes around the Newel Post in the picture on the very first step.
- Cove molding: This is the small decorative molding that goes on the top of each riser under the next tread. It fills in that gap. I have seen it match the risers or the tread. We decided to paint it with the risers, but you could also choose not to.
Staircase Before and After Pictures
Our staircase was 100% oak and it all blended together. While I love wooden staircases, I like ones that have variation. I think it helps to accentuate the stairs. Additionally, that amount of oak can (and does in our house) make the room feel dark.
Our Staircase Before Pictures
This is what our staircase looked like when we moved in. This is the original staircase that is over 30 years old. While you can’t see it in this picture, I will show you in below sections that the risers are not in the best condition.

Here is a picture of the rest of the staircase from the upstairs. Again, everything is all oak with no color variation.

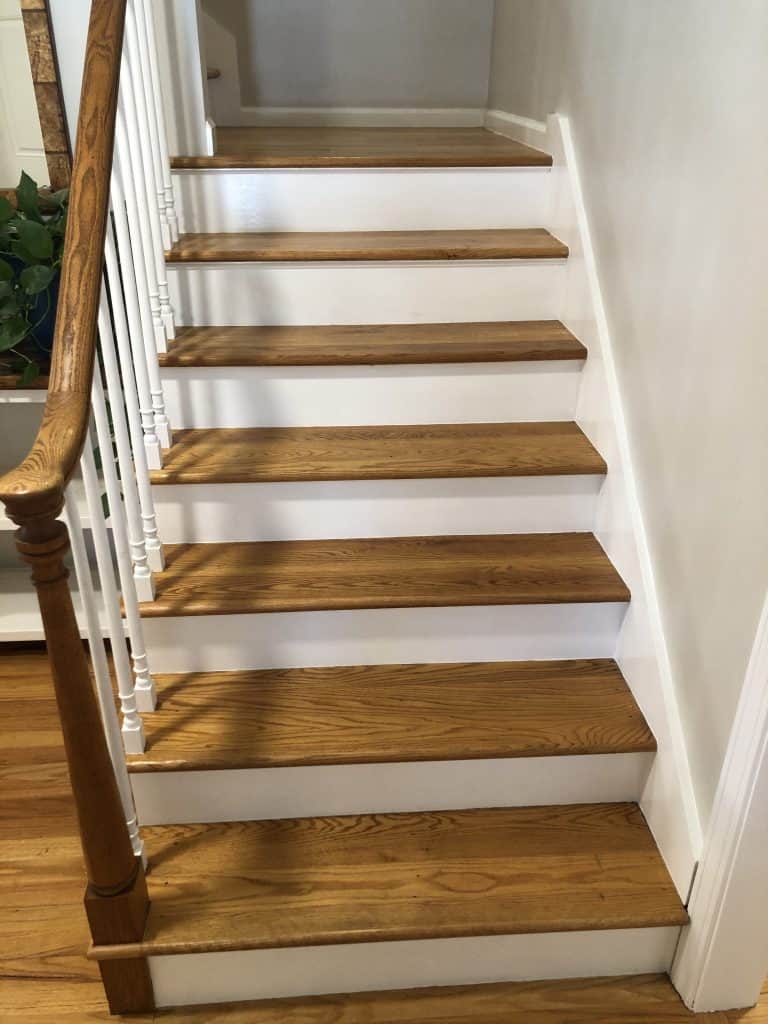
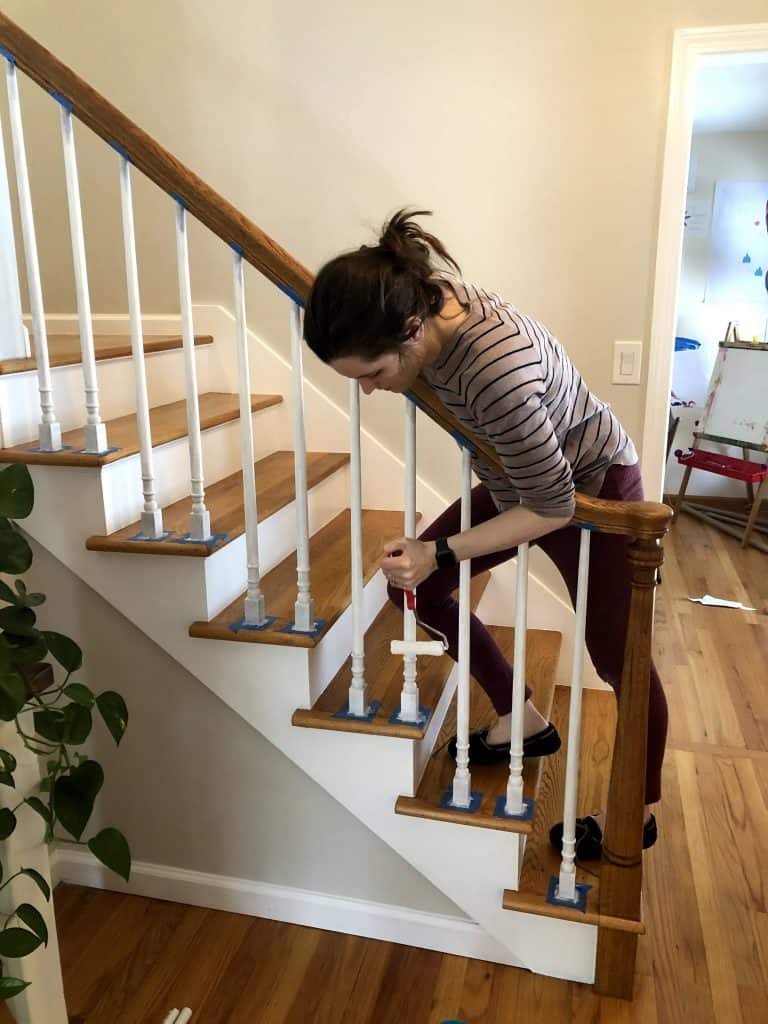
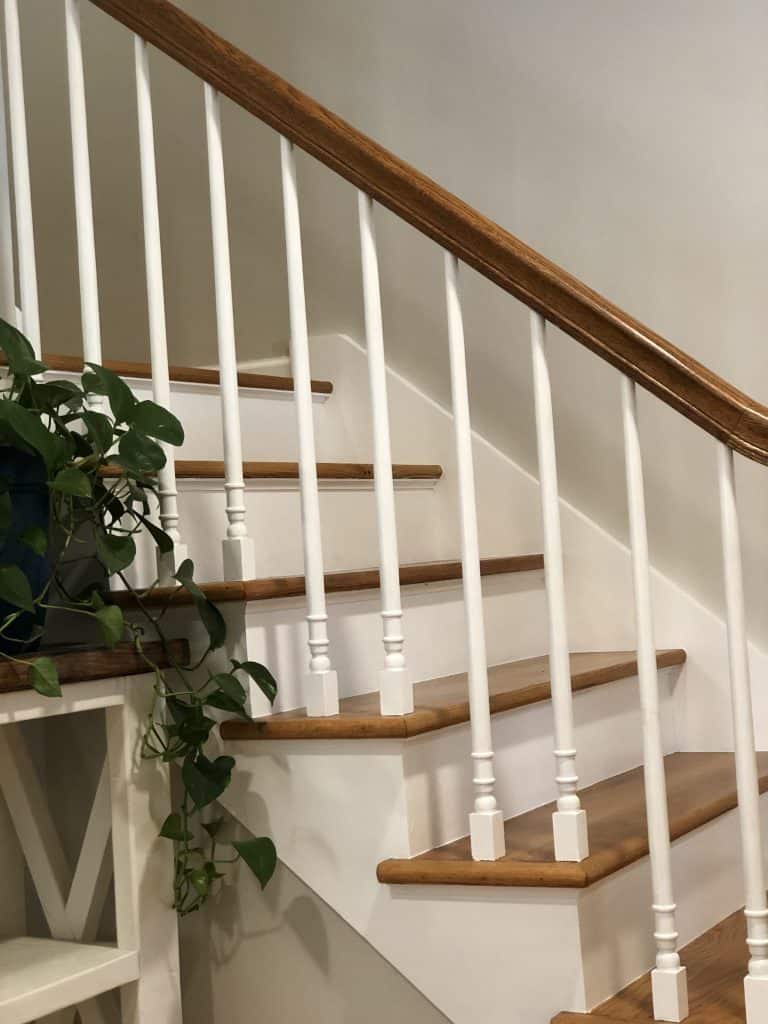
Our Staircase After Photos
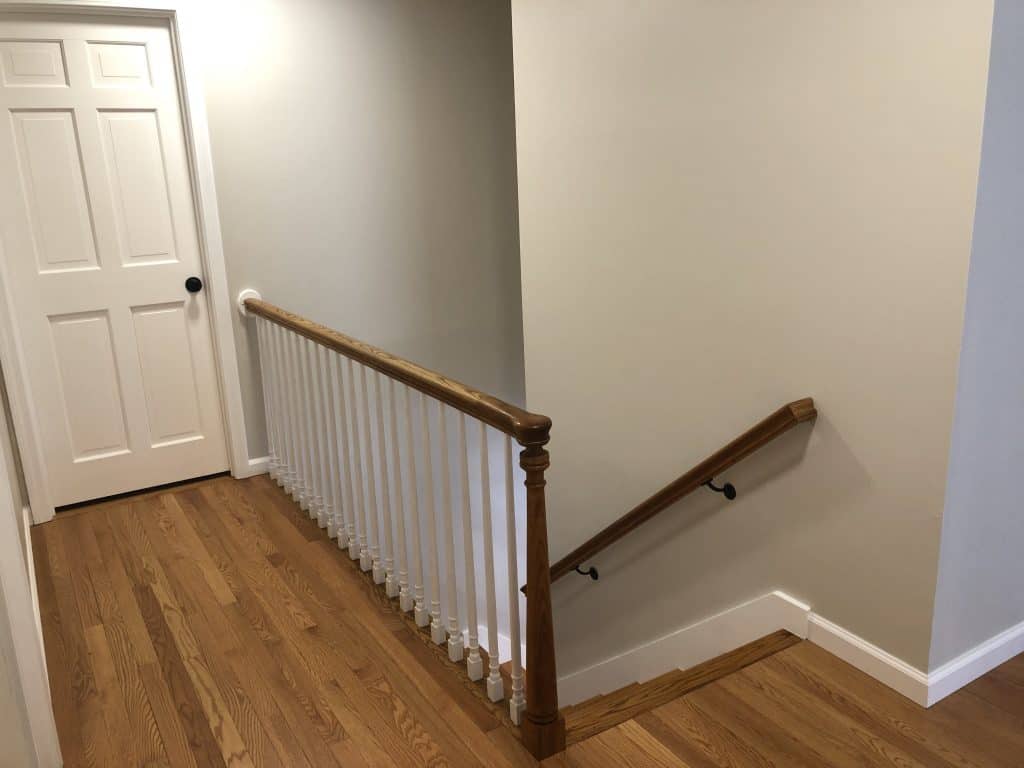
We decided to paint the spindles, risers, string, and cove molding. We did not paint the banister, newel post and the treads. I love how the white and oak contrast. It also brightens up the room so much.

We decided against painting the treads because they gather so much dirt. If you paint them, then don’t do white or you will see every speck of dust.
For right now we decided to not paint the banisters or the newel posts. I think that we might in the future stain the banister a dark mocha color. However, I wanted to take a wait and see approach. I can always go back and stain the banister. It is a lot harder to reverse that process.
How to Paint Stairs
Based on what you want to paint, how to paint a stairwell or a staircase can mean a lot of different things. Therefore, I have broken this section into how to paint the individual parts of a stairwell such as how to paint stair risers, how to paint spindles and how to paint a stair wall.
How to Clean Stairs Before Painting?
You can clean stairs the same way you clean wall or trim before painting. My absolute favorite cleaner is TSP substitute. It is easy to work with, removes everything and doesn’t leave behind any residue. It is extra important to clean banisters and handrails with TSP substitute to remove the grease left behind by hands. I don’t recommend TSP (only TSP substitute) as it is a VERY harsh skin irritant.
Supplies to clean stairs:
- TSP substitute
- Water
- Plastic cleaning bucket
- Gloves
- Sponge
- Lint free rags
- Vacuum

To start, I would vacuum the stairs. You can also sweep but that won’t do as good of a job getting into all the corners or in between spindles. A handheld vacuum will be your best friend here because you will want to do a quick vacuum before every coat of paint. This is because the stairs will be continually used between coats.

Next, take TSP substitute and mix it with equal part water. Make up as much or as little as you think you need. I used a plastic cleaning bucket and made little batches at a time. When the water got gross, I would go make a new batch. Once you have the solution, put on some gloves and use a sponge to wipe down the stairs.
Clean everything you want to paint. It is best to work in sections. Once you use your sponge on a section, you will want to wipe down those surfaces with a lint free rag before it dries. This will help you remove all the dirt, grease, and stains that the TSP solution worked on.
Now you are ready to get started!
How to Paint Stair Risers
In this section, I will go over the process of how to paint the risers (vertical part) of a staircase. It is very common to also paint the strings (trim on stair walls) and the cove molding (molding in the gap under each stair). Therefore, you can this tutorial to paint those as well.
Supplies to paint stair risers:
- Tape
- Small paint tray
- 2-inch angled brush
- Foam rollers
- Roller handle
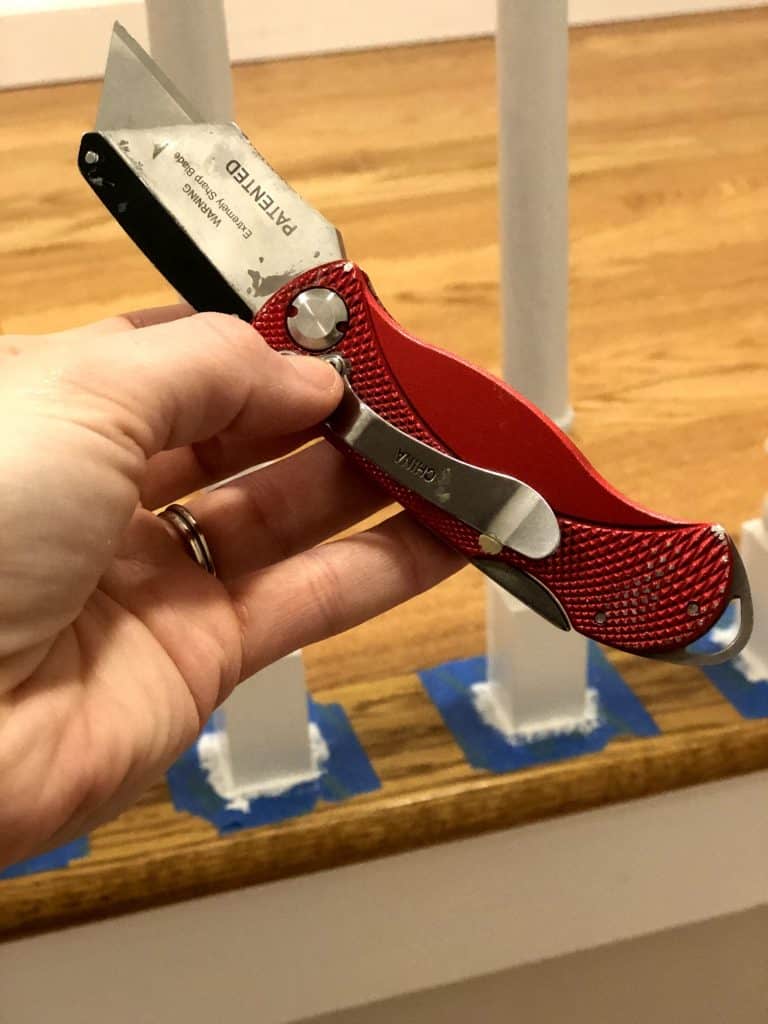
- Razor
- Pocket knife

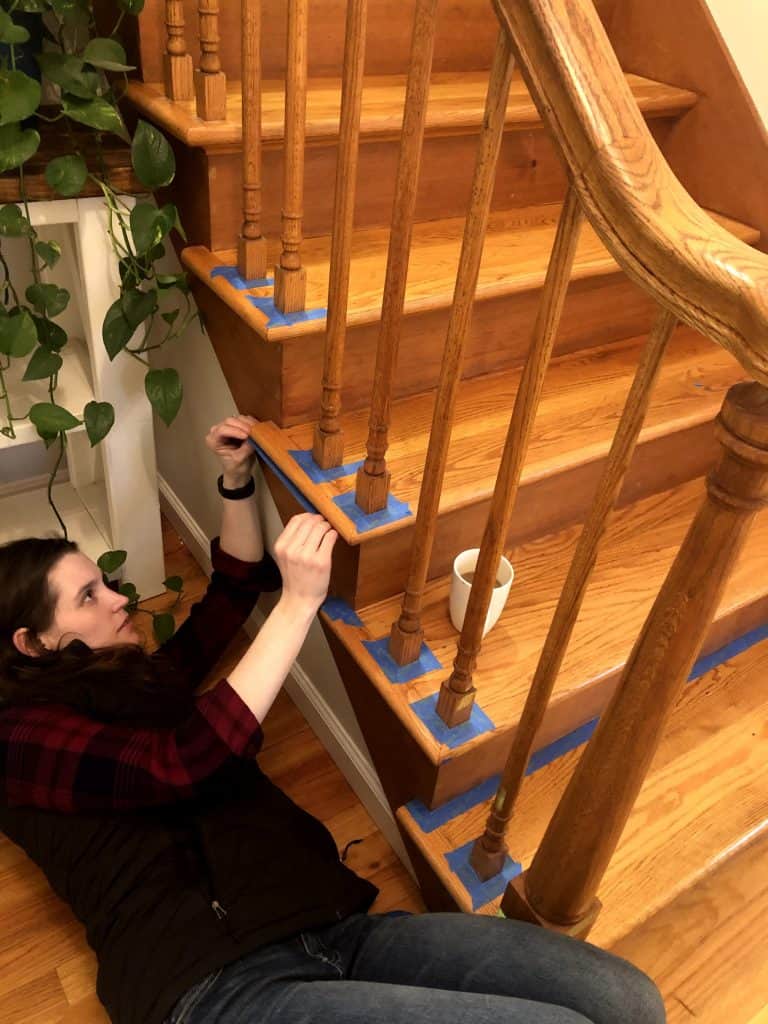
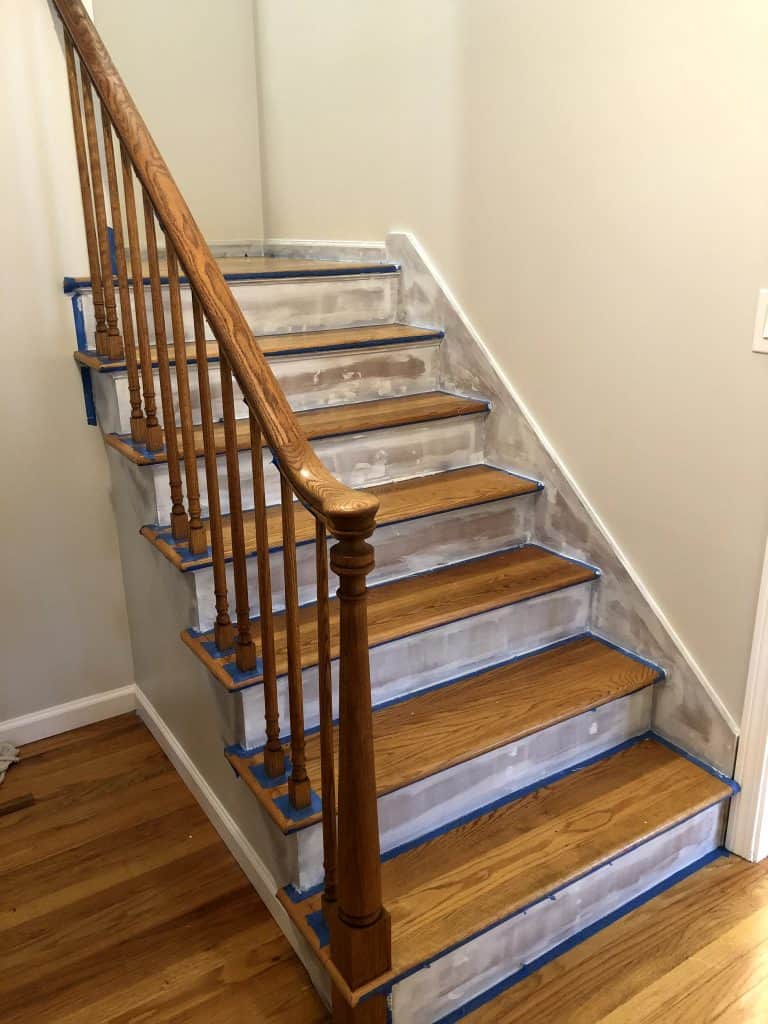
Step 1: Spend a lot of time taping
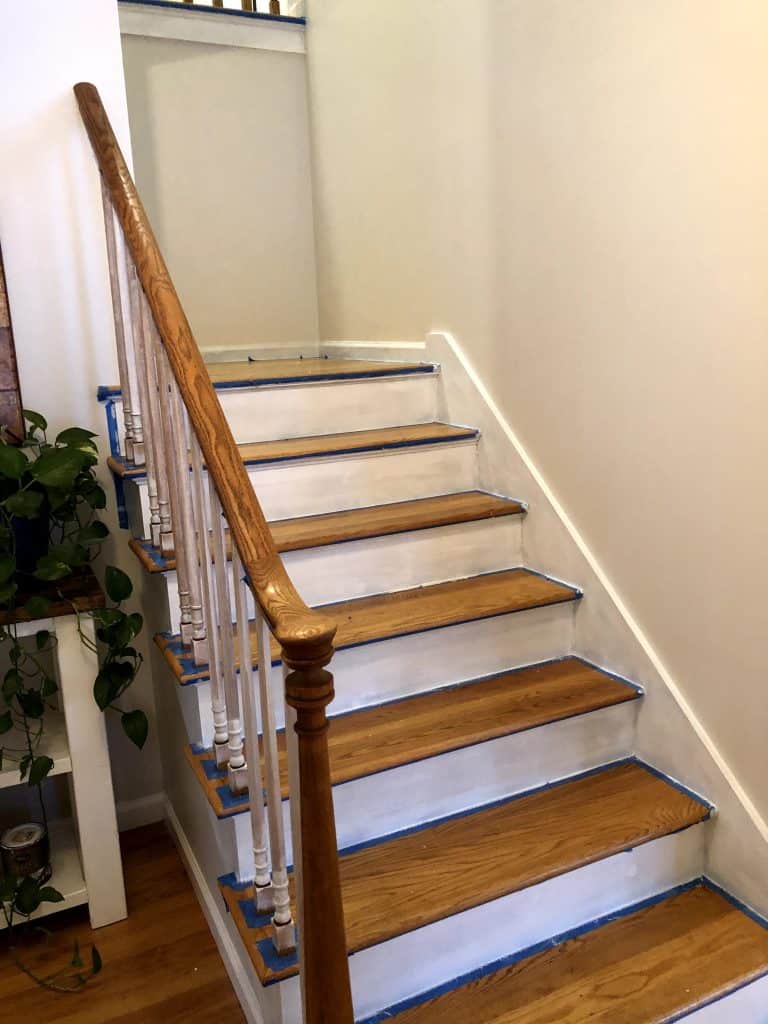
Since there are a lot of edges, you will spend a lot of time taping. Grab a cup of coffee and listen to some good music while you tape. While I usually use thicker paint tape, for stairs I found it was so much easier to work with the thinner tape.
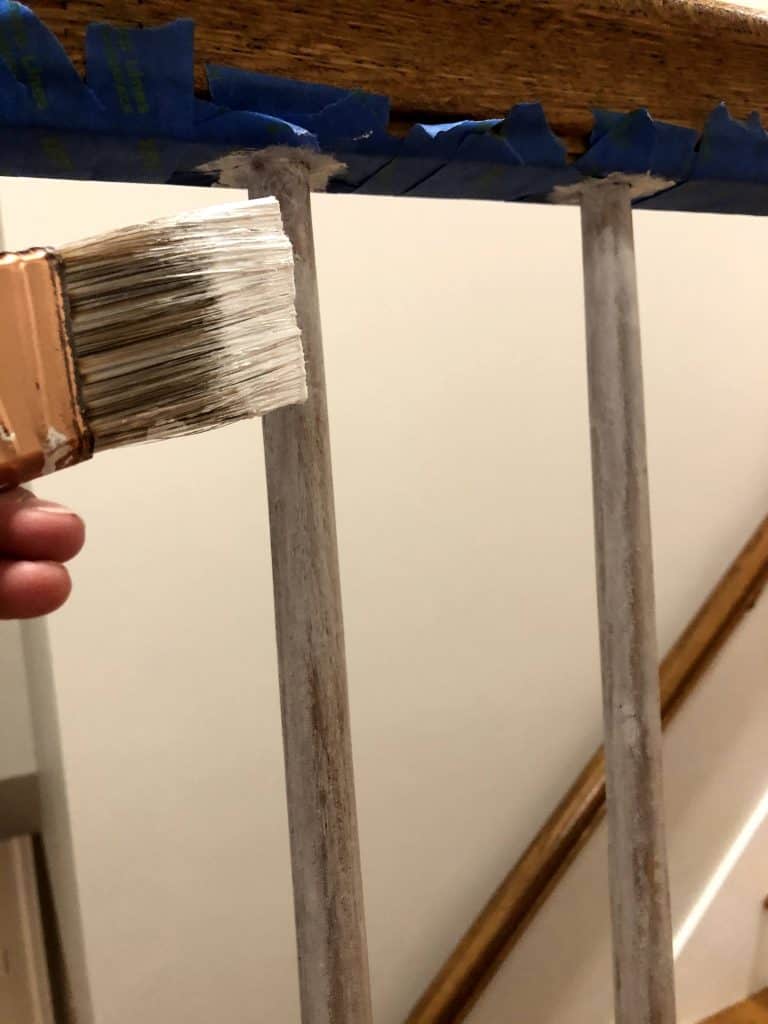
As you can see in this picture, I am taping to be able to paint the risers, string and spindles. I decided during taping to paint the cove molding because I couldn’t tape it well. The cove molding is the decorative molding between the risers and the tread. It is not a flat surface, so it was impossible to cover with tape. Instead, I taped the bottom of the tread.
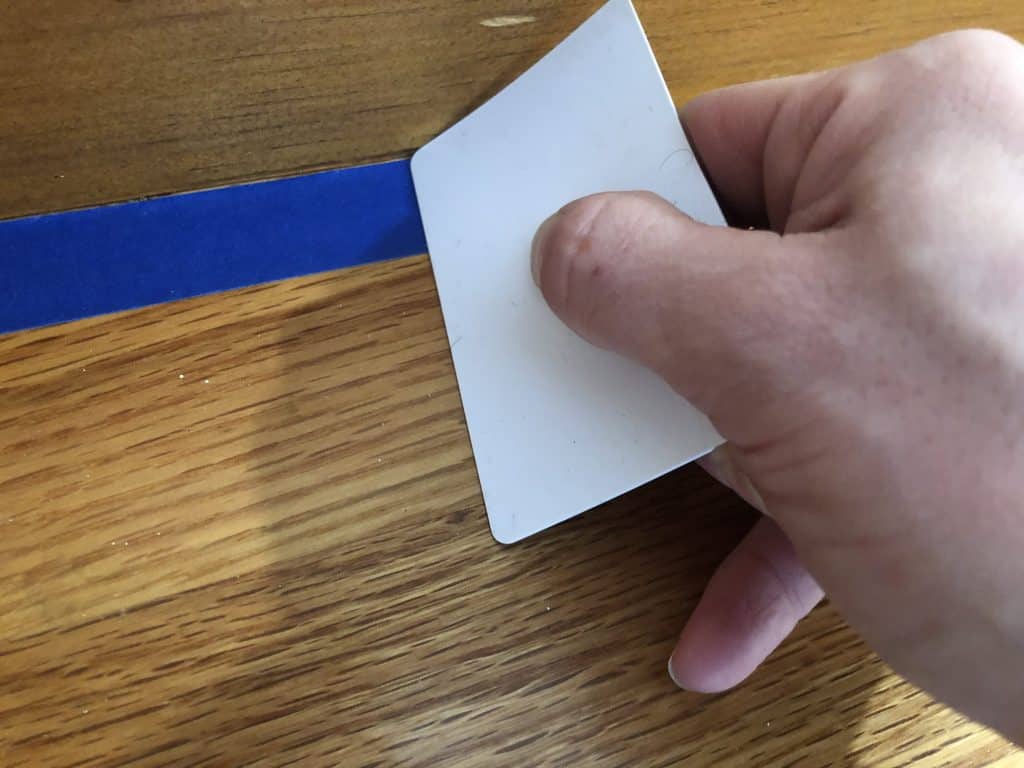
A good trick is to run a plastic gift card or hotel key over the tape. This will ensure it lays completely flat so there are no bumps or gaps for paint to get in giving you those beautiful crisp lines.
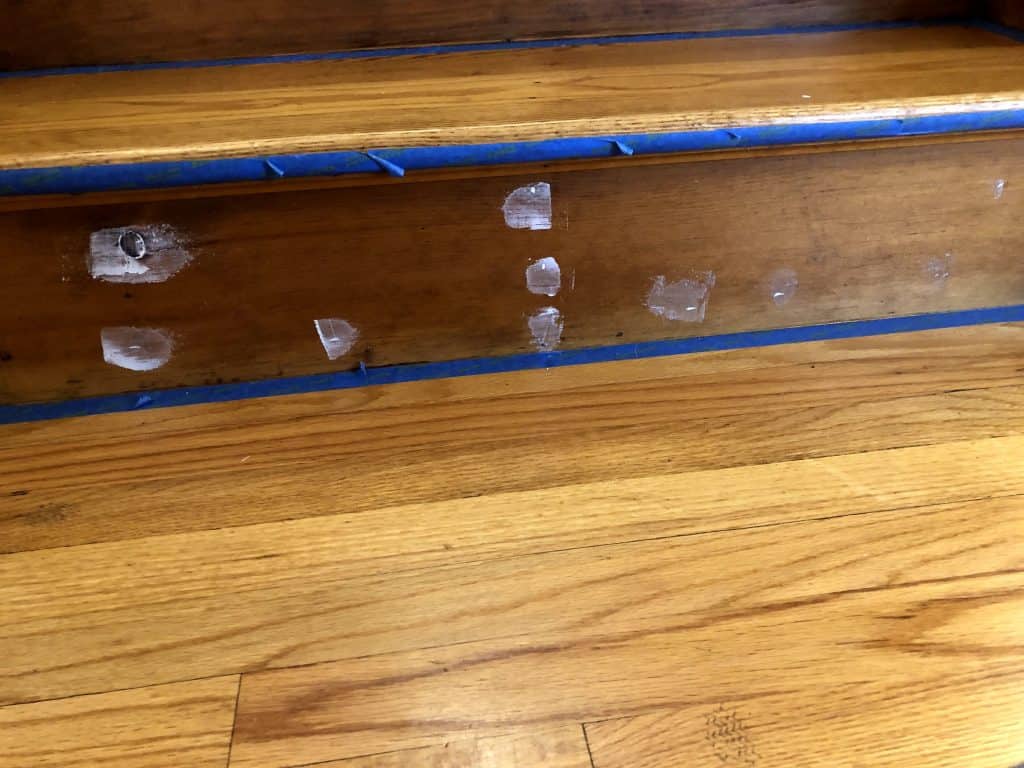
Step 2: Repair Damage
Paint is not thick enough (no matter how many coats you do!) to hide dents. One of the reasons we decided to paint the risers was because they were pretty banged up. You can see the wear and tear in this picture.
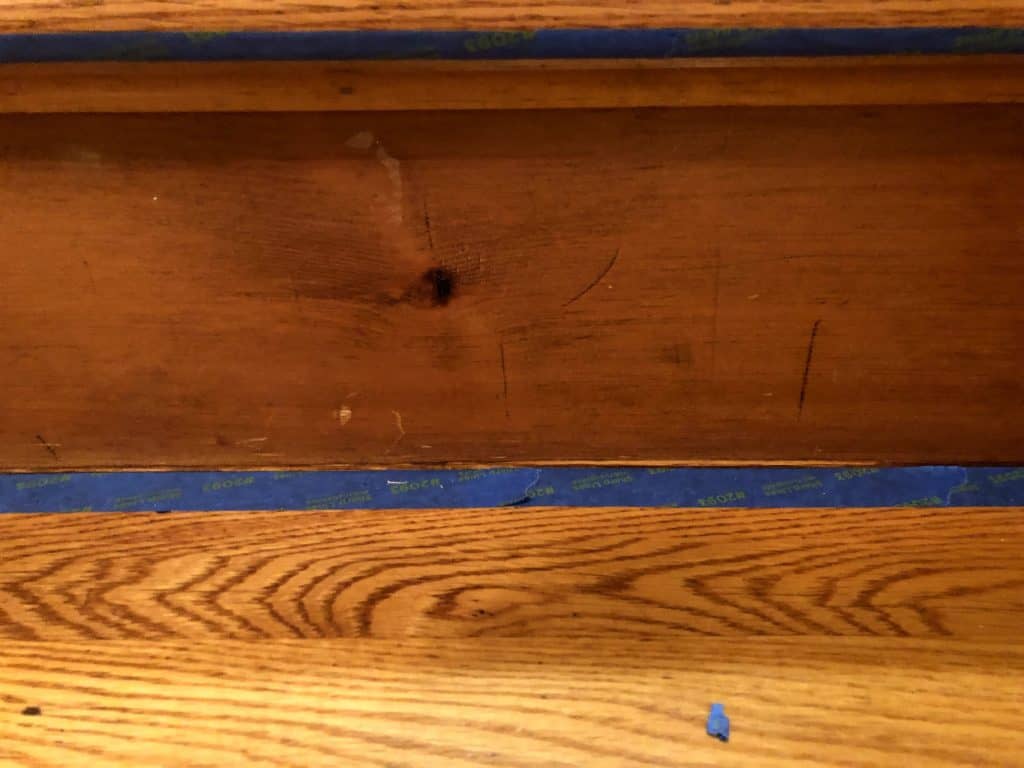
To fill in these holes, we used the DAP wood filler and a putty knife. You just want to fill the holes and then remove the excess as much as possible.
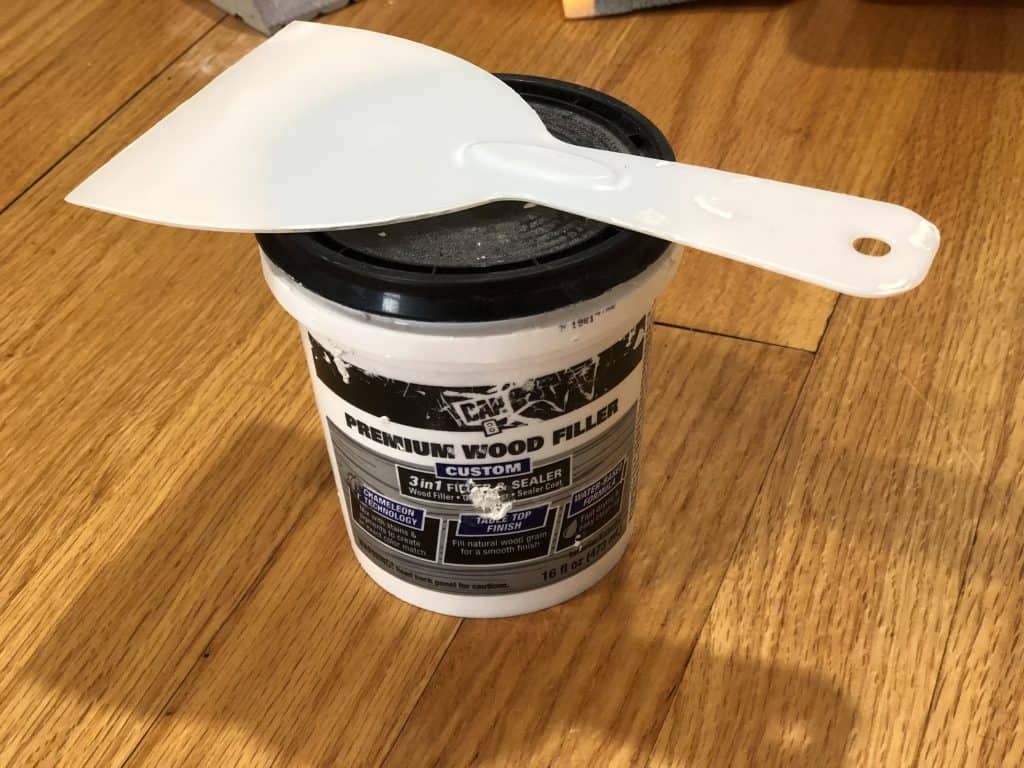
Once dry, you can use a sand sponge to sand it until smooth.
Step 3: Caulk gaps with a PAINTABLE caulk
If gaps are big enough, then paint won’t be able to cover them. The magic solution is PAINTABLE caulk. It is easy to use and can be painted. It really gives you that professional look. I used it when I painted our oak trim white between the wall and the trim.

To use it, cut a very small hole at the tip, put it in a caulk gun, and apply a thin line on the gap. Then run your finger or even a wet paper towel over the line to smooth it out. It will be dry and ready to be painted in 30 minutes.

Step 4: Sand if you want (optional)
Some people recommend sanding so that the primer and paint can stick to the surface. Since the surface is glossy, paint will not stick to it. It will peel off like a film.
If you do NOT sand, then you must absolutely use a primer that sticks to glossy surfaces. Even if you do sand I recommend using a primer that sticks to glossy surfaces.
It is also important to note that when you sand, you don’t want to remove the finish. You just want to roughen it up. To sand, I would use a 120 grit sanding sponge. The sponge will be much easier to work with.

I use the Zinsser 123 water-based primer for all of my projects and highly recommend it. It will stick to glossy surfaces. I have had zero chipping and peeling, and I have used it to paint our oak trim, our doors, our windows and even to paint our kitchen cabinets.

Step 5: Cut in primer with an angled
Take a 2-inch angled brush and cut in. Be sure to pour your paint into a small tray. Leaving your can so you can dip your brush in will cause that primer (or paint) in the can to dry out and become stickier. The stickier it is, the harder it is to smooth out on a surface. It is better to always use a small brush tray.
Aim for thin coats over full coverage. Coverage will come as you do more coats. Thick coats will lead to more brush strokes, drips and globs.
Allow the brushed primer to completely dry before moving to the next step. There should be a recoat time on the back of every primer or paint can.

Step 6: Foam roll primer (2x)
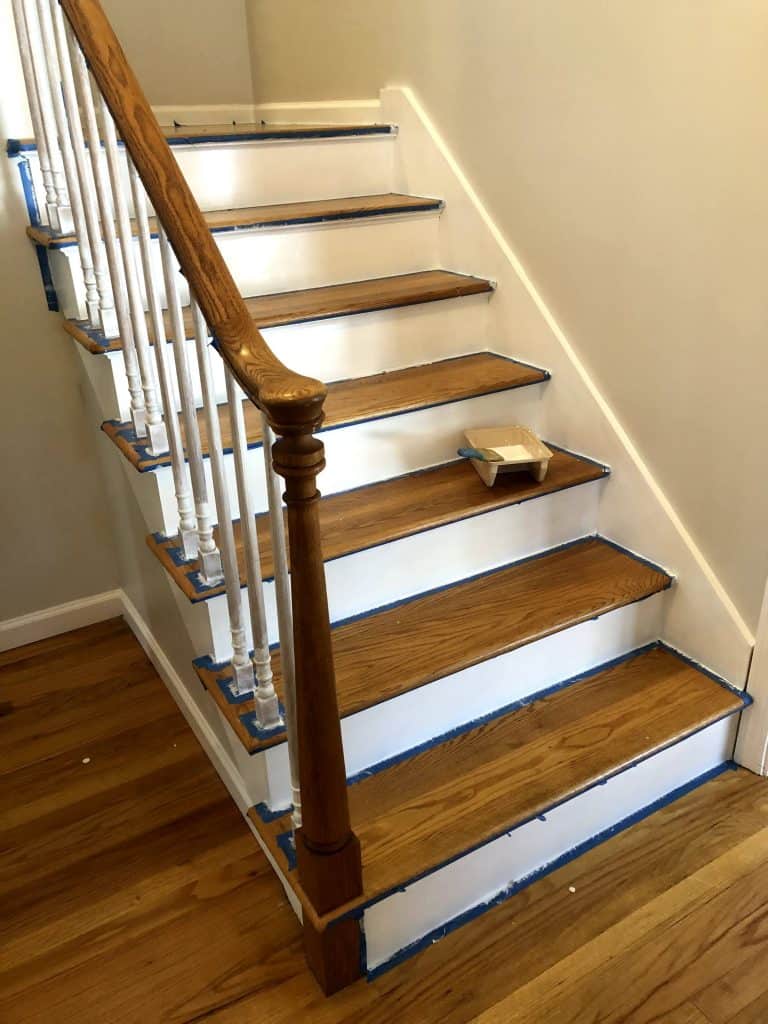
To minimize brush strokes, I would avoid brushing the stairs completely. Instead, after you finish cutting in, I would switch to a foam roller. You want to use foam instead of any other type of roller because that will give you the smoothest surface.
The trick when working with foam rollers is to roll each spot a few times more than you think you need to get that smooth look. Additionally, foam rolling will give you a thinner coat than brushing as you can see in this picture. Therefore, for each coat of brush, I do two coats of foam rolling.
Allow primer to complete dry based on the recoat time on the can before doing the second coat of foam rolling.
Step 7: Repeat steps above
You want to do another coat of primer meaning one coat of brush and two coats foam roll. So in total, to complete primer, you want:
- Cut in with a brush
- Foam Roll
- Foam Roll
- Cut in with a brush
- Foam roll
- Foam roll
While you might initially thing this is overkill, primer is very important.
It will not only give your paint something to stick to but also hide the dark wood color. Lastly primer will block the tannins in wood from staining your paint and eventually turning it yellow. The best way to ensure your paint does not peel, chip or turn yellow is to get a good solid coat of primer on it.
Before we move on to paint, a quick tip is that if you do get a dried drip, sand it down before moving to your next coat. If you are doing thin coats, then it will be very easy to sand it down.
Step 8: Repeat everything with paint
Now you move on to your paint of choice and go through the same steps as the primer. The only thing that will change is the time to recoat so be sure to check the can. Also remember to always use a small tray so you are not leaving your paint can open. Here is the process:
- Cut in with a brush
- Foam Roll
- Foam Roll
- Cut in with a brush
- Foam roll
- Foam roll
What paint should I use to paint stairs?
The paint I decided to use on the stairs was the Marquee Paint at Home Depot in Ultra Pure White. It is an acrylic paint. Other popular options are the Sherwin Williams Pro Classic Paint (acrylic/alkyd paint) or the Benjamin Moore Advance (alkyd paint).
The main difference here is that an alkyd paint is not water based. Alkyd paints tend to take longer to dry which can make the paint go on more smoothly. However, alkyd paints tend to turn yellow or fade in color over time.
I made my paint choice based on personal experience in working with all three types of paint. I like the acrylic Marquee paint the best.
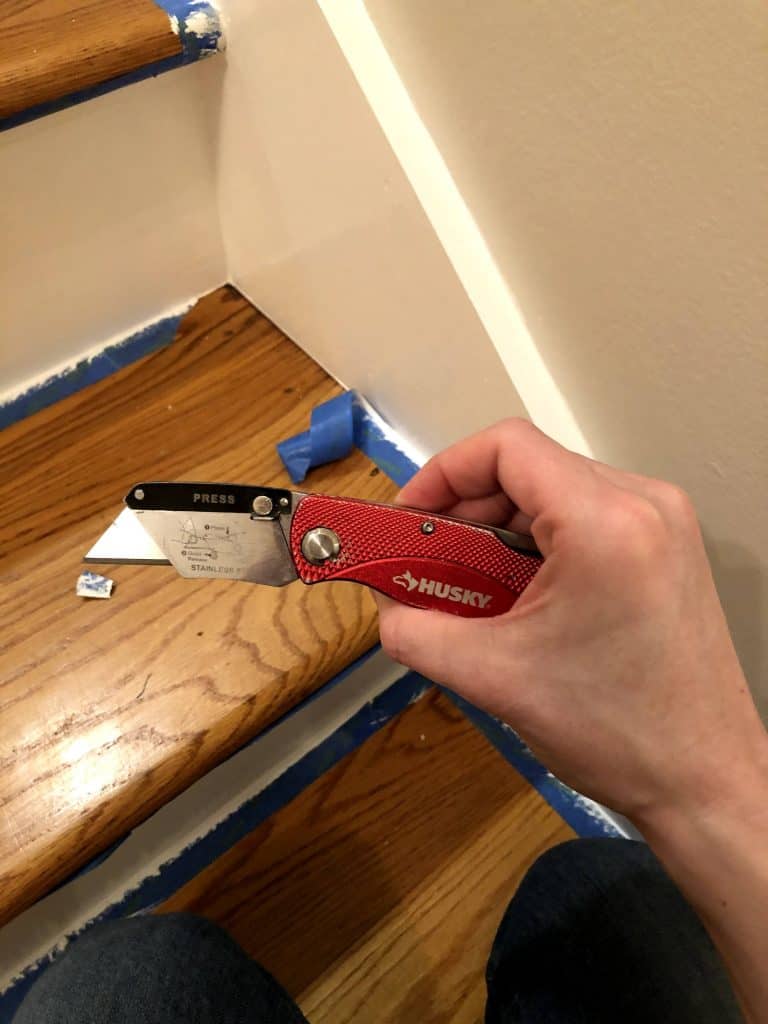
Step 9: Cut tape before peeling
Once you have finished painting and the paint is dry, you can begin to remove the tape. It is very important to not rip the tape. It will tear at the paint and give you a bumpy edge. Instead, take a pocket knife and cut the tape before you peel it.
Step 10: Use razor blade to clean up lines
Even the best painters will have some paint get under the tape. To clean up your lines, take a razor blade and gently remove the paint from the floor. I also use this trick to remove any drips on the stairs or floors.

Now enjoy your new stair risers!
How to Paint Stair Spindles
Painting stair spindles, also called banister spindles or balusters, is a very different process than painting the risers on stairs. This is especially the case when they are round because it is very hard to brush paint on that type of surface. So first, the supplies you need to paint stair spindles are the same that you need to paint the stair risers.
Supplies to Paint Stair Spindles:
- Tape
- Small paint tray
- 2-inch angled brush
- Foam rollers
- Roller handle
- Razor
- Pocket knife
Now, how to paint spindles so you can avoid brush strokes…
How to paint stair spindles without brush marks
Once I decided that I did indeed want to paint the spindles, the next task was to figure out the best way to paint them. So, I tried out the following:
- Foam Brush
- Paint Sponge
- Foam Roller
- Angled Brush

Through trial and error, I found that to avoid brush marks you need to do horizontal not vertical strokes.
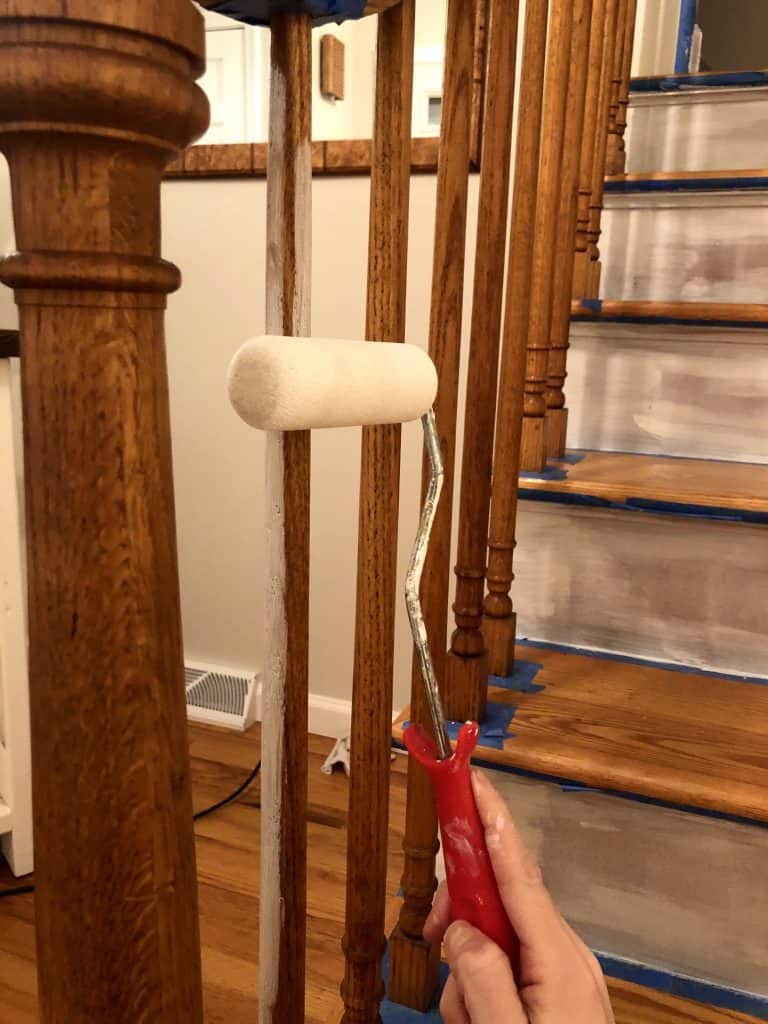
In the end, I decided on a combination of brush and foam roll. I would “cut in” using the brush at the tops and bottoms of each spindle. To do this, I would run my brush horizontal and not up and down. This was very important to avoiding brush marks and getting even coverage.
Once the paint dried, I would foam roll the rest of the spindle. In addition to giving me that smooth brush mark free look, it was also the fastest method.
Now how to paint your stair spindles?
Step 1: Tape the whole under side of the railing and the bottom of each spindle
I started out just taping around each spindle. However, I soon found that was a mistake and I needed to tape the whole underside of the railing. This would allow me to foam roll as high as I possible could meaning I wouldn’t need to brush as much on the top part of each spindle.

Step 2: Foam roll your first coat of primer (x2)
Since foam rolling leaves behind less paint than brush, you want to do this step twice. Roll up and down until you have the whole spindle covered. Go as far up and down as you can, leaving behind only a small part to be brushed.
This will look “bad” if you did it correctly. To ensure no drips or runs, you want to do thin coats. As you continue doing thin coats, it will start to give you that smooth professional look you are going for.
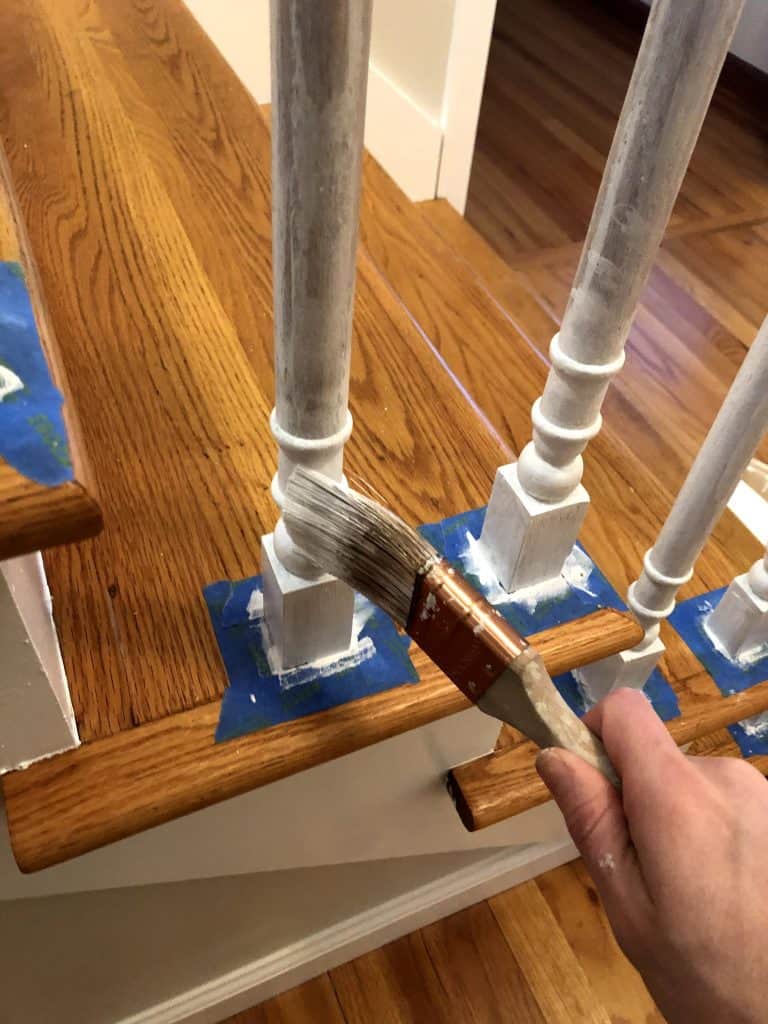
Step 3: Brush primer on top and bottom of spindle with horizontal strokes
The key here is horizontal. This will allow you to coat the very top and bottom you could not reach with the roller.
Step 4: Brush primer horizontally on any spindle design
Our spindles had this design at the bottom of each spindle. It was very hard to foam roll, so I used the brush. It worked very well as long as I did horizontal brush strokes and not vertical.
Step 5: If you get any dried drips, sand before moving to the next coat
Try to always check over each spindle after you finish so you can fix drips before they dry. If you find dried drips, sand them with 120 grit sandpaper and then 220 grit sandpaper before painting the next coat.
Remember it OKAY that the coats are uneven as long as they are thin. They will even out as you add more coats, I promise.
Step 6: Repeat primer steps with paint.
Now you have the process down, all that is left is to repeat the process with paint. The paint we used for the spindles was the Marquee Behr Ultra White paint in semi-gloss. To recap you want to:
- Foam roll each spindle (x2)
- Paint the tops and bottoms of each spindle with horizontal brush strokes
- Foam roll each spindle (x2)
- Paint the tops and bottoms of each spindle with horizontal brush strokes
Be sure to let the paint dry in between each coat based on the recoat time on the back of the paint can.
Step 7: Cut tape before peeling
Paint forms a film, and you are going to chip and peel your paint if you don’t first cut it before ripping it up. This will give you those beautiful crisp lines you are looking for.
Now enjoy your new spindles!
How to Paint Stairwell Walls
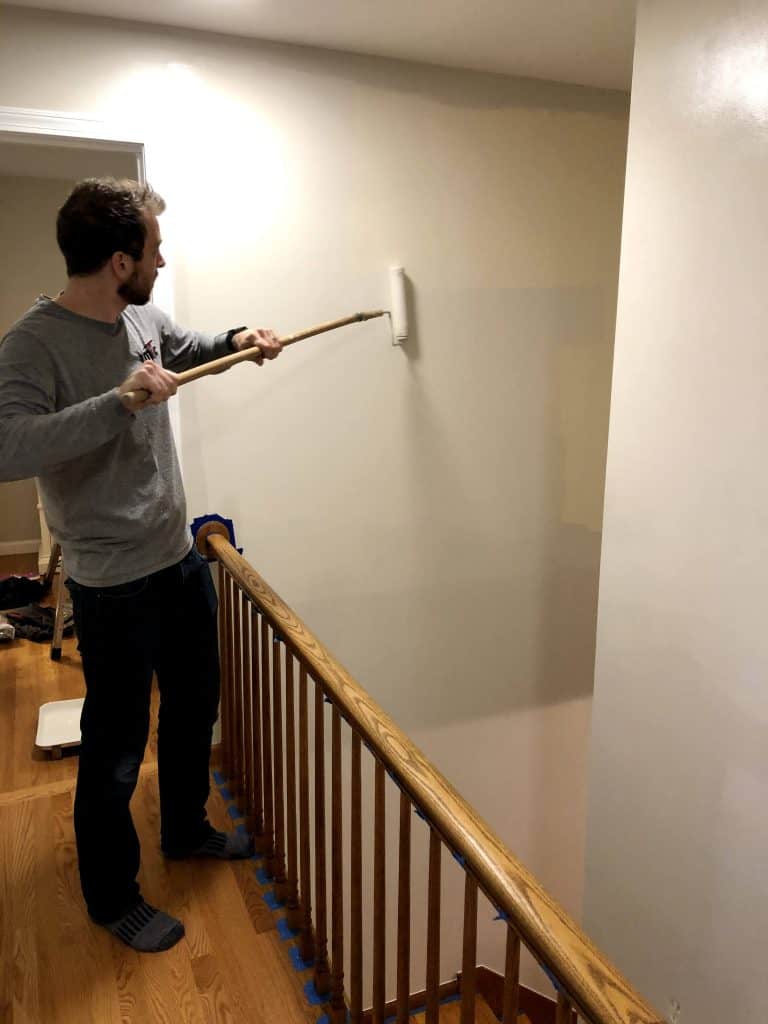
The biggest challenge to painting stair walls is height. Since I am afraid of heights, I had my husband do the actual painting.
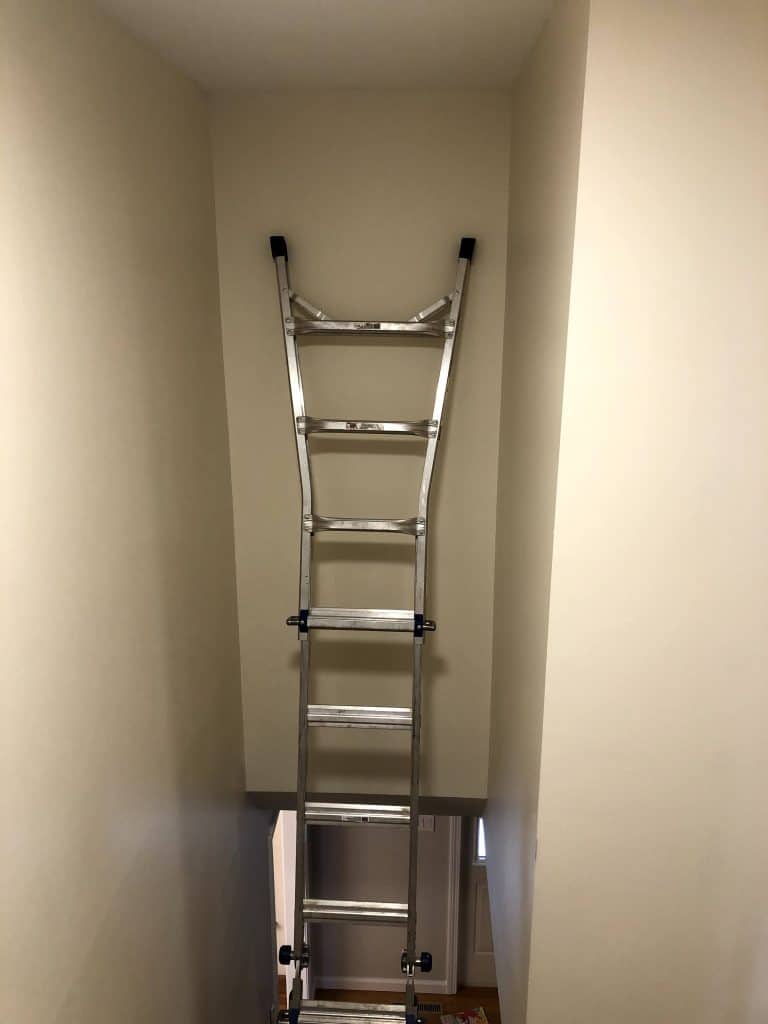
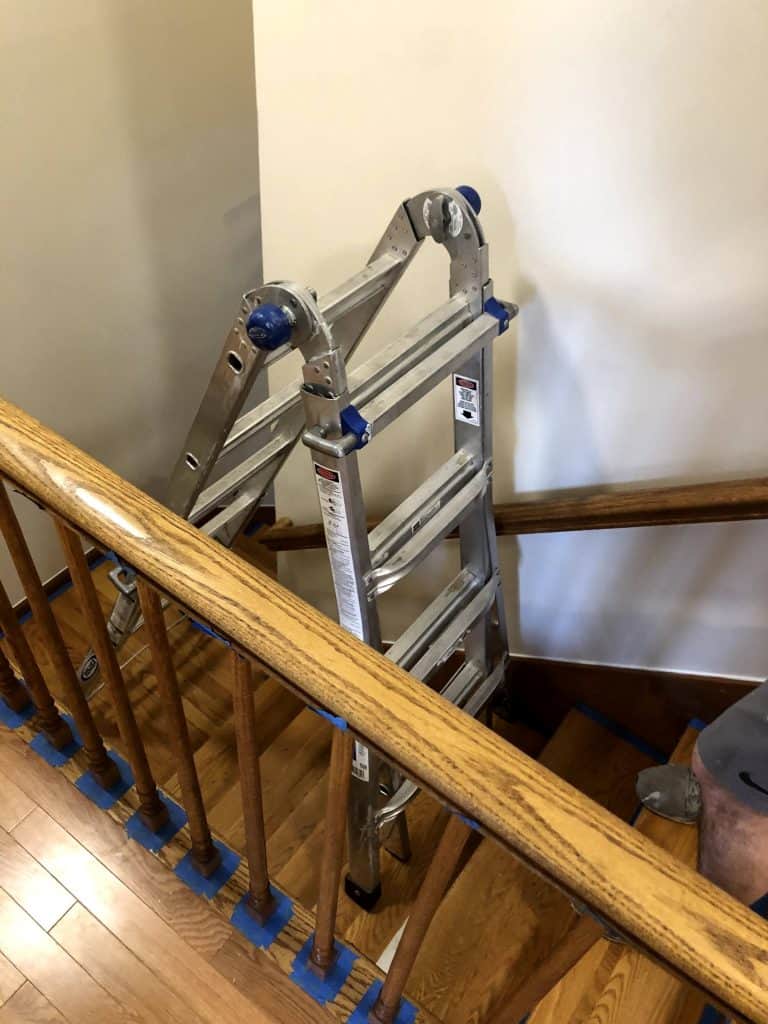
How to paint stairwell walls without scaffolding
We did not use scaffolding. Instead, we were able to paint all of the stair walls by using a Little Giant Ladder along with a roller pole. You can see how we did this below. The pictures should hopefully give you an idea of how you could do the same thing with your stairs.
Supplies to paint stair walls:
- Paint Roller Pole Attachement
- Paint Roller Handle and Paint rollers
- Angled 2-inch brush
- Ladder
- Primer (optional)
- Paint
We did not use a primer because painting stairs is tricky. Instead to make it easier on ourselves, we did the paint with a primer mixed in. We used the Marquee Paint and Primer in semi-gloss. The color we decided on was Pale Oak. It is a Sherwin Williams color, but you can still have that color made at Home Depot. For more color ideas, check out my best paint color tips.
Step 1: Check you reach to the ceiling with a brush and then cut in
Before you start painting, set up your ladder so you know you can cut in along the ceiling with a brush.
Once you know you can reach the ceiling with a brush everywhere in your staircase, then start cutting in. This will be the hardest part.
Step 2: Use a roller on a pole
Now, use the paint roller with the pole attachment to paint everything you can reach without a ladder.
Step 3: Use a Little Giant ladder (or similar) to paint everywhere else
The reason you want this type of ladder is you can change the heights of both sides of the ladder. This will allow you to put the top and bottom of the ladder on different stairs.
We used this ladder in combination with the roller pole attachment to paint where we could not reach with just the pole.
Now enjoy that beautiful staircase with a new coat of paint. It was very hard to get a good photo that showed the stair walls but hopefully this one will give you the idea.
How to Paint Stairs
Painting stairs can feel like a daunting task but really it just takes a lot of tape, the right type of primer and paint, and some elbow grease.
We decided to paint our risers, spindles, and stair walls to update our 30 year old stairwell. It’s crazy how much brighter our stairs feel with the white spindles and risers. The fresh coat of paint on the walls was much needed and also gave the space a more modern look.
I hope that by sharing our tutorial along with tips and tricks will help you in your stair painting project.
If you found this guide on how to paint stairs helpful, please share it on Pinterest or Facebook


I am a wife, teacher, and mother to two awesome girls. I write about what I am passionate about, which includes being a mom, house projects, beauty and skincare. I love to share my experiences, failures, and successes with my readers. Let this space be a resource for you to pursue your very best day.